
MOOIEV BLOG
Mooiev features: plan your film and connect your crew
Explore Mooiev’s screenwriting, storyboards, shot lists, call sheets, crew and creative network. See sample work and start with 2 free active projects.
In this article 16 sections
What makes filmmaking software the best fit for your project?
The best filmmaking software for your workflow should help you finish the decisions your production actually needs. A director developing a short film, a cinematographer planning coverage and a producer preparing a client shoot start with different questions. Mooiev brings writing, visual planning, production documents and collaborators into one project so you can follow the work from an idea to a shareable plan.
This is Mooiev’s own feature guide, based on the current application and its original demonstration project. It explains what the tools do and where to start; it is not an independent ranking of every filmmaking product. Use the linked walkthroughs and real sample documents to evaluate the workflow yourself.
Mooiev’s features at a glance
| Your work | Tools to use | What you leave with |
|---|---|---|
| Set up the production | Overview, cover, project type, milestones and notes | A shared brief and project context |
| Develop the story | Screenplay, AV Script, comments, versions and exports | A readable script and a reviewable draft |
| Build visual continuity | World, Style, Characters, Locations, Props, Wardrobe and Scene Kit | Reusable references for each scene |
| Plan the coverage | Shots, Storyboard, Canvas and Stage | Coverage, shot notes and camera blocking |
| Prepare the shoot | Breakdown, shooting schedule, cast, DOOD, call sheets and gear | A production day the crew can review |
| Manage costs and presentations | Budget, treatment, lookbook and proposal | Cost review and documents for the right audience |
| Collaborate and show the work | Crew roles, permissions, tasks, comments, activity, messaging, profiles and Wrap | Clear responsibilities and work with professional context |
1. Choose the project and the tools you need
Start with Shots only for focused shot planning, Client work for a production with a client brief, or Full production for a film needing writing, breakdown, cast and a schedule. These are starting sets of tools. You can adjust the project’s tools as the work develops instead of maintaining several unrelated projects for the same film.
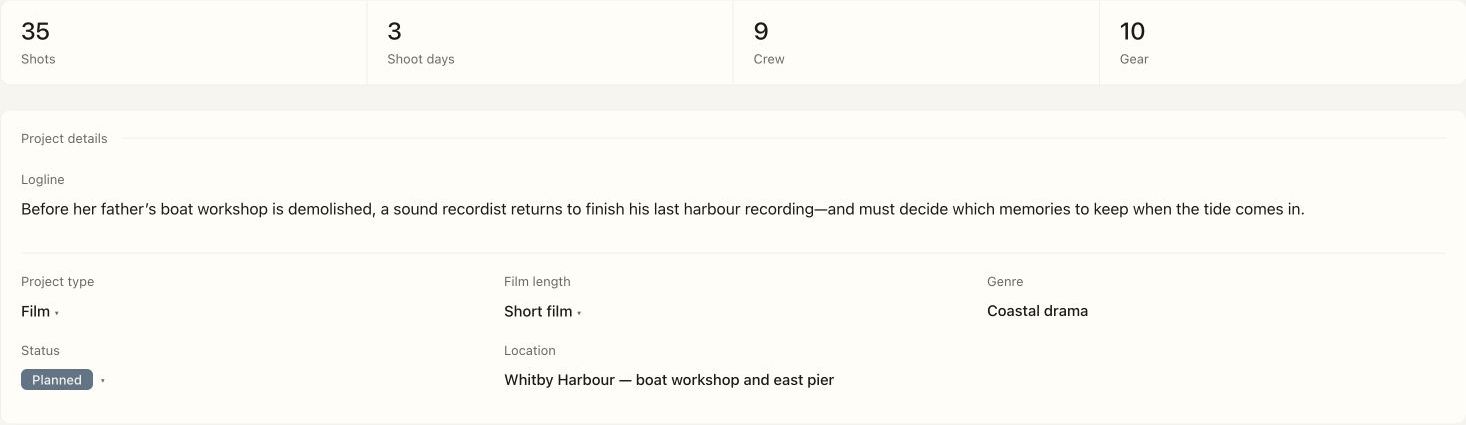
Use Overview to establish the project name, cover, logline, type, film length where relevant, genre, status and location. Shoot days, edit deadlines and delivery dates give the work a timeline. Put the working approach in project notes so the team can understand the brief before opening individual shots.
For a series, use the episode workspace to keep the production organized by episode. Crew invitations can use episode-specific or series scope where the workflow offers it. Check the intended scope before sharing access to future episodes.
2. Write the screenplay, format it and keep versions
The screenplay editor has separate controls for Scene, Action, Character, Dialogue, Parenthetical and Transition. Use the visible controls, Tab and the slash menu to work with screenplay elements. Bold, italic, underline and alignment controls support text formatting; scene navigation helps you move through the draft.
Import options include Fountain, text, Markdown, Final Draft XML and PDF. Check the result, particularly PDF extraction, scene headings and dialogue indentation. Save versions and preview an earlier version before restoring it. Script collaboration and scene-linked comments let colleagues discuss the writing in context.
Export a complete screenplay PDF, character sides or a scene breakdown. The export preview is where to check the whole document, including its title page and page boundaries. You can write and edit the script yourself; AI assistance is an optional part of the workflow.
3. Write an AV script when image and sound need to align
AV Script gives each row a visual description and audio text. Add a duration and, when useful, a shot reference. The running times make the relationship between the picture, voice-over and total length visible without forcing the material into screenplay dialogue formatting.
Add, duplicate and reorder rows as the sequence changes. Review the text, references and timings, then preview the PDF. This is useful for an advertisement, explainer, interview sequence or other piece where the order of image and sound is the main planning problem.
4. Build the film’s World: style, characters, places and objects
World is the shared visual reference collection. Characters, Locations, Style, Wardrobe and Props give the film a consistent vocabulary before you produce a board. Add records manually and use your own reference images. Optional generation can help develop references, but you can begin with a description and a photograph.
Scene Kit brings a scene’s cast, location, wardrobe and physical items into a focused review. Use it to spot what the scene still needs, and to set its light, time and weather context. The point is to keep the same character, outfit and location identifiable across the shots that use them.
5. Plan shots, review boards and arrange the Canvas
Create shots by hand with scene and shot identifiers, description, size, angle, movement, camera notes, cast and location references. Search and review coverage as the plan grows. Script-assisted shot suggestions and video analysis are additional starting points; the director still decides which shots belong in the sequence.
Storyboard connects each frame to the shot it describes. Upload references or use optional generation, then review the sequence for geography and continuity. Canvas lets you arrange shot cards and sticky notes spatially and connect ideas. A note on the board can explain a transition or a missing insert without becoming a new camera setup.
6. Block the camera, cast and lights in Stage
Open Stage from a shot to plan the space around that setup. Place people, camera, lights and set pieces, then adjust positions, orientation and relevant framing choices. The scene’s set and the shot’s camera arrangement give the overhead diagram a specific production context.
The 2D plan and experimental 3D view help you discuss eyelines, positions and the camera’s point of view. Treat the result as a planning model: check dimensions, lens behaviour, access and the actual location with the crew. An illustrative frame is not a surveyed set or a measured lighting simulation.
7. Break down the scene and plan shoot days
Breakdown records the people and production elements a scene needs. Review cast, props, wardrobe and other requirements, then use the shooting schedule to organize the work into days. Story order and shooting order can differ; access, light and performer availability shape the practical plan.
Cast scheduling and Day Out of Days help you review who works on which dates. Use the shooting-day view and schedule calendar for production dates; these are separate from the future standalone content-calendar module. A schedule change still needs a review of the affected shots, cast and documents.
8. Prepare call sheets and the documents the crew receives
Build a call sheet around a shoot day: date, crew call, location, scenes, cast and individual call times. Review location, weather, nearest-hospital information and contacts for your own production before distributing the day’s plan. Check receipt and confirmation information in the call-sheet workflow where available.
Mooiev’s document previews let you inspect complete pages before saving or sharing. The sample production includes screenplay, shot list, schedule and call-sheet PDFs. Open the actual file and read it at a usable scale rather than judging its layout from a thumbnail.
9. Prepare gear and track the budget
Gear organizes the equipment the project needs, with categories, quantities, notes and packed status. Bring relevant equipment from your saved inventory or add a project item. A shot’s camera or lighting note should lead to a practical equipment check, including support, batteries, media and accessories.
Budget holds categorized line items, estimated cost, actual spending and variance in the selected currency. You can add items, bring in talent from the cast schedule and use available inventory or location records when relevant. Save edits before preparing a budget preview or downloading CSV. The totals help you review costs; they do not obtain a supplier quote or approve a purchase.
10. Keep notes, tasks, comments and activity with the work
Project notes describe the wider brief. Contextual comments discuss a specific section or scene. Tasks in the collaboration panel give a request an assignee and a status, while Activity shows relevant changes. Use a comment to explain a decision and a task when somebody needs to complete an action.
Crew permissions control access to project areas. Check what a collaborator can view or edit before asking them to review a budget, screenplay or production document. Direct messages and connections support conversations with people; project notes remain a better place for decisions the production team needs to find later.
11. Present a treatment, lookbook or proposal
Treatment assembles existing project material into a visual presentation: cover, notes, character references, locations and storyboard frames. Review what is included, open the preview and save or share the document. The treatment uses the images in the project, so a complete reference collection improves the result.
Proposal presents the approach, deliverables, timeline, budget and team for a client conversation. Populate those records first, then inspect the proposal. Preview the version you are about to share and keep internal notes or unapproved costs out of a client-facing document.
12. Find collaborators, review applications and manage the crew
Discover brings together project wraps, hire posts and questions for the community. Connections and filmmaker profiles give a conversation professional context. Review selected work and the person’s contribution before discussing a role, dates and availability.
Inside the production, Crew groups collaborators by role and responsibility. Invite people or publish an open role, review applicants and bring an accepted collaborator into the project. Assign access and work according to the role. Portfolio presentation and an application are the beginning of a conversation about the production, not a substitute for agreeing its scope.
13. Show the finished work on a filmmaker portfolio
A Mooiev profile can hold a professional role, location, introduction, photos, reel, selected work, credits and relevant role-specific details. Add the contribution behind each image so a future collaborator can see what you actually did. Rates, availability, skills, equipment and external links add useful context where appropriate.
Wrapping a project can turn the production into a case-study page and project credit. Review the cover, summary, work and collaborator contributions before sharing it. Export a portfolio when you need a document version of selected profile material.
14. Choose a starting point and check availability
For a small task, use the free shot list maker, script timer, gear checklist, Day Out of Days generator or call-sheet weather checklist. A connected production workspace requires an account, with access and generation allowances depending on the plan. Check current account limits before planning paid generation or a large project.
AI video is a restricted beta. The 3D Stage is an experimental view. Brand Deals and the standalone content calendar are marked as coming later; they are not completed sponsor-management tools. The shooting schedule and production-day calendar are existing scheduling workflows.
If your question is “which is the best setup for my film?”, begin with one scene: write it, identify its requirements, create coverage, place it in a shoot day and open the exported document. Then ask one intended collaborator to review the same material. That concrete handoff is more useful than choosing from a long list of feature names.
Compare pre-production software by workflow